I wanted to share a few Harry Potter miniatures I made that don’t really ‘belong’ to any of the rooms in the dollhouse.
I fashioned five of the horcruxes out of trinkets and such from my stash. Rowena Ravenclaw’s Diadem, Salazar Slytherin’s locket, and Marvolo Gaunt’s ring are mostly bits of old jewelry reimagined. Helga Hufflepuff’s cup is a mini bowl and jewelry fixings under a generous coat of gold paint, and Tom Riddle’s diary is a little dollhouse book that I distressed to look like it had taken a hit from a basilisk fang.
While it’s not a horcrux like the other items belonging to the other Hogwarts Founders, I also made the Sword of Gryffindor. It’s my favorite piece of the lot, and is made up of jewelry fixings, part of a pencil, a masonry nail and the ‘gem’ from a red stud earring.
My daughter really loves these pieces – they are often the subject of the adventures and quests her dolls go on. My son hasn’t gotten far enough in the books to know what the horcruxes are, but he knows the journal and sword from the early books, and as for the rest, he loves anything that looks like pirate ‘treasure.’ Whenever we can’t find something gold/silver/sparkly, we’ve learned to check inside the various mini trunks and chests he plays with. He’s basically a real-life pirate.
The last thing is the Sorting Hat. I saw a mini felt witch’s hat in some Halloween clearance one year and snagged it. I wasn’t sure how I’d be able to transform it into the Sorting Hat, but it cost pennies and was the perfect size.
It was quite stiff and stubbornly kept its shape, so I spent a while squeezing it and smushing it and bashing it and folding it and twisting it and crumpling it until it loosened up. Then I pretty much drenched it in a mix of mod podge and brown paint and used various clips to create folds and hold them in place as it dried. I wasn’t even going to try to create a ‘face’ among the folds, but I think it kinda ended up looking like one!
Making these kinds of miniature objects/accessories is what I really love and I don’t plan on stopping anytime soon! But I am going to keep pushing forward with making miniature furniture and structures. Can’t get better unless I try, right?
Now that we’re done looking at the rooms in the Hogwarts Castle Dollhouse, it’s time to go back to the beginning – how the bookcase itself became a castle.
Ok, if we’re going to back to the beginning, we may as well go back to the beginning beginning. Of the bookcase that is. I bought it at IKEA in 2005, from their line of Billy products. I don’t remember how much I paid for it, but judging by the price today, I would guess it was less than $50. I used it in my childhood bedroom for a few years and then took it with me when I moved out. I moved a total of four times before settling in our current home, bringing it with me each time. It has served many purposes over the years: it’s been used as a bookshelf (duh), extra shelving in closets, toy storage in my son’s nursery, and most recently, a catch-all for a year’s worth of remote school ‘stuff’.
Phew! I’m exhausted just writing all that. Imagine how the bookcase must feel! After remote school was done, the bookcase sat empty for a few days, and it dawned on me it would be the perfect home for all of the Harry Potter miniatures I had been making. And so, the shelf retired from its shelving duties and will live out the rest of its days as a dollhouse.
Why am I sharing all of this? Two reasons. One: Because IKEA deserves some serious kudos for the Billy bookcase. Not only was/is it super affordable, but it has survived 17 years of continuous use, five homes, four moves, two kids, and a pandemic, and it’s no worse for the wear. And now it will be enjoyed as a dollhouse for years to come. Bravo IKEA!
And, Two: Because somehow I find it lovely that an item that was with us for so many year and through so many stages of life, has been given a special purpose. Every time I look at it I’m flooded with memories – our first (minuscule) apartment, my son as a baby, and even remote school. It’s super cheesy, but true!
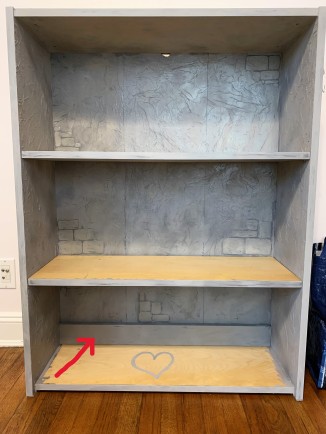
I did have to modify the bookcase a bit for it to work with the Mattel Harry Potter dolls. The height of the shelves was ever so slightly too short for the 12-inch dolls to fit. But where there is a will there’s a way. At the base of the bookcase there is a kickboard (is that what it’s called?) a few inches high. I removed the kickboard and then was able to drop the bottom shelf down to the floor. With these extra few inches of space the dolls fit perfectly. The kickboard seemed to provide a substantial amount of stability to the shelf, so I re-attached it along the back of the bottom shelf. In Hagrid’s Hut and the Common Room, you can see a little ledge along the back wall – that’s the kickboard. For smaller sized dolls, the bookcase would be perfect as-is.
After modifying the bookcase
Before and after modifying the bookcase
Once that was done, I started working on the back ‘wall’ of the castle dollhouse. The back of the bookcase is a panel that slides in and out of the frame. I slid it out and marked it with the dimensions of the rooms I had planned. Then I cut rounded rectangles in various sizes out of scrap cardboard and glued clusters of them down in the corners of the ‘rooms’.
The back panel with the rooms marked off and the cardboard ‘stones’ applied
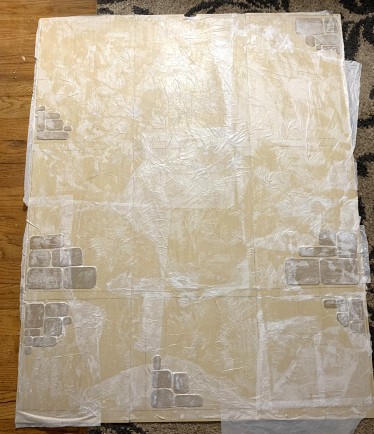
Once the glue dried, I decoupaged the entire wall (cardboard ‘stones’ included) with tissue paper and mod podge. The tissue paper bubbled and wrinkled a bit as it was applied, which gave the wall a great texture when it dried. I painted over the tissue paper using a few different shades of gray and tan until I was happy with how it looked. I like how the handful of cardboard ‘stones’ gives it a stone-wall feel without actually having to cover the whole thing with little ‘stones’! Ain’t nobody got time for that.
…and painting
After decoupaging…
Interior done!
I repeated the decoupage/paint process for the inner sides of the bookcase and painted the undersides of the shelves gray. That was basically it for the interior of the case, besides the usual coats of sealant spray.
For the exterior, I used sheets of adhesive faux bricks. While I was visiting my sister in Texas last year she handed them to me and asked if I could use them. I think she was a bit surprised at my enthusiastic ‘YES!’ I just trimmed the sheets to size, stuck ‘em on, and painted it all. I was concerned the ‘bricks’ were too large for the castle but I think it turned out alright. Besides it was easy. And free.
After painting the bricks
The adhesive bricks before painting
I didn’t have to spend a single cent on any of the above steps. I had everything already, or got it free. (Thanks sis!)
What do you think? I am hoping to get to IKEA soon to buy another bookcase so I can really get started working on the second ‘installation’ of Harry Potter dollhouse rooms. Honeydukes in miniature is coming along and needs a home…
When we were in Vermont last August, we spent a day at the Shelburne Museum. I had been there as a child, and I remember liking it, but not much else. I had vague memories of boat and a lighthouse surrounded by grass, and a dollhouse taller than me. As this seemed a bit wacky, I figured my childhood memories and my imagination had blurred together over the years. But nope! I can now confirm that the museum does indeed include a boat and a lighthouse in the middle of a field, as well as several large dollhouses – pretty much exactly as I remembered them.
The Ticonderoga – a 220-ft steamboat – surrounded by grass
Obviously, I mostly want to talk about the dollhouses, but first, a quick overview of the Shelburne Museum for context. The museum was founded in 1947 by a wealthy heiress named Electra Havemeyer Webb. Her parents were collectors of fine art, which she shared an interest in, but she became especially interested in collecting historical artifacts and folk art. She felt these ‘everyday’ items had a beauty of their own, and that it was important to preserve them for future generations.
The museum is most definitely a testament to her life’s passion – it is made up of 39 separate buildings, spread over 45 acres of gorgeous, landscaped land. Of those 39 buildings, 25 are historical structures that Ms. Webb had relocated to the museum – including a vintage carousel, a covered bridge, a railroad station, a sawmill, and yes, an old lighthouse and steamer boat. The buildings themselves house an unusually wide array of collections – everything from antique farm equipment, duck decoys, and carousel figures, to paintings by Edgar Degas and Mary Cassatt. Ms. Webb herself described the museum perfectly as a ‘collection of collections.’
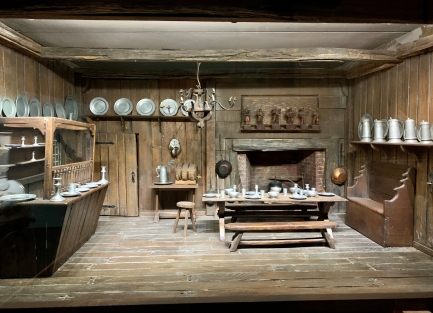
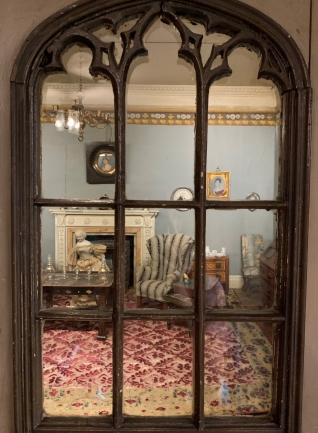
One of the museum’s most well-known collections is housed in its ‘Toy Shop’ – dolls! Ms. Webb began collecting them as a child, and today her collection stands at over 1,000 dolls, many from the eighteenth and nineteenth centuries. She also collected and redecorated antique dollhouses, finding them a unique way to depict what life was like at various moments in history. I had so much fun (literally) peeking into these windows to the past. Each house was meticulously decorated in the style of a by-gone era. Many of the miniatures were made by Ms. Webb herself, or by artisans she commissioned.
The exhibits were in a dim room, and behind glass, so it was difficult to get good pictures. But nevertheless, I took pictures of every corner of every room of every dollhouse. I’m pretty sure the other museum-goers (and my husband) thought I was crazy. But I kinda am, and it’s good to be yourself, right?
I will let the pictures speak for themselves.
As a fan of miniatures, another exhibit I really enjoyed was her collection of antique circus toys, including a miniature 112-piece hand-carved circus parade. Yes, you read that right – the miniature parade measures over 500 feet long. A man named Roy Arnold began carving the miniature pieces in 1925, meticulously modeling them after real-life circus carriages. It ultimately took him and four others 30 years to complete.
The last exhibit I want to share is also a stunning set of hand-carved miniatures. In 1910 a man named Edgar Decker Kurt began carving miniature circus pieces for his children to play with. Over the next 40+ years he continued adding to the set, ultimately carving a whopping 3,500 individual pieces! My kids joked that I would end up like Mr. Kurt- still adding to their miniature Harry Potter collection long after they were of toy-playing age. They’re probably right.
If you are ever in the Shelburne, VT area, check out the museum!
This morning I came across this little scene in our office/craft/guest room (it’s basically our own little Room of Requirement). Apparently, my daughter’s entire dollhouse family had traveled down to our first floor to dine at a restaurant. It’s quite a distance from their house, but thankfully they had a big cozy car they could all fit in for the journey. 😍
I love stumbling across evidence of an imagination at work ❤️
[Insert obligatory comment acknowledging how long it’s been since I last posted and explaining that I’ve been busy volunteering at the kid’s school]
Now that that’s over with, it’s time for the last room in my Hogwarts Castle Dollhouse – Hagrid’s Hut!
So, I wasn’t able to allocate much space to Hagrid’s Hut, but we really wanted to include it – Hogwarts isn’t Hogwarts without Hagrid! It’s kind of ironic that the biggest character/doll ended up with the least space – he actually can’t fit standing up in his ‘hut’. But no one needs to know that, right?
All joking aside, my daughter was ok with the lack-of-space issue, and just wanted a bit of space that Hagrid could call his own, and that captured the feel of his home. His hut is a bit of a juxtaposition. It’s very utilitarian – packed with supplies and tools for his gamekeeper-duties, as well as materials for his Care of Magical Creatures classes. But it’s also cozy and home-y, with lots of warm touches – the fireplace and kettle, candles, area rugs, his bedding, and even the colored panes in the windows. For the purposes of our limited-space room, we focused on the living area, and did not include his bed, etc.
The scaling/placement of the room, furniture, and the window are way off. Gah. I struggled given the small space I had to work with and finally said, ‘It is what it is!’ and moved on. But I do hope to return to it at some point and work on resizing things.
The floor is the same stone-style as in most of the other rooms, and I left the walls ‘bare’ besides the window showing the Castle in the distance. For the window I used a piece of transparency sheet with a diamond pane pattern printed on it and colored in a few of the panes with markers. The window-frame is made from wood scraps and the picture of the castle is a sticker.
I made the fireplace from scraps of balsa wood, and wooden cubes that I bought at Dollar Tree. I painted the whole thing brown and glued a little hook to the front of the mantle. I made the wooden beam across the top of the room in much the same way – scrap wood cut to size and painted brown, with a few hooks glued on. The wall rack is made from two large popsicle sticks that I trimmed, and- you guessed it – glued a few hooks onto. The hooks are all from a packet of hook-and-eye fasteners I found in my grandmother’s sewing basket, which was passed down to me after she passed. I think of her every time I see those little hooks!
I bought a wooden oval from Hobby Lobby for about $2 and cut it in half to make the tabletop. The ‘leg’ of the table is made from the lid of a Pure Leaf Iced Tea bottle glued to the top of a large wooden spool. I bought the chair/stool at AC Moore for $1, and the crate/cage sitting on the floor is made from scraps of balsa wood glued together. Everything got a few coats of paint and sealer, and done!
You can just see the iced tea bottle cap peeking out under the tabletop,
And now for my favorite part – all the random doodads throughout the room. I love making little doodads! The dishes are a mix of items we made from polymer clay, and items we already owned. We made the jars and bottles from beads and jewelry fixings. The cage hanging from the beam is made from a champagne wire and a piece of wood. The item hanging to the right is made from a washer, an old wingnut, and part of a garter clip I also found in my grandmother’s sewing basket! I bought the hanging glass globe hanging on the left from Hobby Lobby for $2.40. The leathery pouch hanging on the wall is from a scrap of material I cut from a pair of old boots before I tossed them. We already owned the red lamp hanging beside the pouch as well as the basket under the table. The pieces of ‘fruit’ in the basket are little pod-thingies I pulled off of some faux greenery I had. The basket on the table is twine wrapped around a plastic cap, and I made Hagrid’s umbrella from paper, a toothpick, and a little bead. My son supplied the snail shell and the tiny acorn on the beam from his nature collection.
I think that’s pretty much it – oh besides the brass kettle! I bought the kettle at an antique shop in Vermont for $3 – a bit more than I would usually spend, but it screamed ‘Hagrid’s Hut!’ to me. And besides, I was on vacation, and it’s ok to splurge when you’re on vacation, right?
Ok. Drumroll. Time to tally the cost for the whole project!
First the total for Hagrid’s Hut: $9.40.
That brings the grand total (if I did my math right) to $40.27. Not bad!
Wow. I’m sorry. The last two weeks totally got away from me. I had a migraine for a few days (gah!), the kids were off school, then back at school, then I was volunteering at school, then the kids got sick, etc. Basically, normal mom stuff, just a bit crazier than the usual crazy.
But, back to Hogwarts Castle!
‘Herbology’ is one of my favorite parts of the Harry Potter series. Somehow it captures the feeling of my own childhood-imaginings – a feeling I don’t often experience as an adult. As with many aspects of the books, I also love the depth of the detail it involves. It’s all there – from the names of plants to their descriptions, histories, life cycles, uses, and dangers. All of this detail lends a sense of credibility to such a fantastical world which is largely what maintains our interest as readers.
My workspace got a bit crazy while I was working on the Herbology room. Creative process, right?
Having said that, I struggled bringing the wonderful world of Herbology to life in the Greenhouse room. My representations of various magical plants came across as cheesy and just didn’t translate – a frustrating disconnect for sure. In the end I found that both mantras ‘the more the better’ and ‘less is more’ rang true! Greenhouses often seem to be bursting at the seams with plants, and the more plants I added to the room, the more realistic it looked. At the same time, I found it worked best not to overdo the overtly magical plants. One or two obviously odd plants tucked among the rest, along with some warning/poison signage, set the magical tone perfectly.
It’s Herbology time!
I barely spent on anything for this room. The floor is the same as the ‘stone’ floors I made in other rooms. The wall on the left is papered with scrapbook paper from my stash, and I already had the little wooden crate that serves as storage in back of the greenhouse – I just added a little shelf to it using scraps of wood and painted it. All of the plants were crafted from random sprigs of faux plants that I accumulated over the years and/or polymer clay, with the exception of the ‘spidery’ plant hanging from the ceiling, which I bought for $.30. I also bought the little orange-ish bowls sitting on the shelf for $.30. (Yay for Michaels clearance!). The plant pots are an assortment of painted bottle caps, and I made the plant stand/trays/trellis from popsicle sticks. Obviously, I did not make the gardening tools – they are from our collection of dollhouse accessories.
I wanted to add a slanted roof to contribute to the greenhouse vibe. Scrap wood painted green provided the frame, and I printed the ‘panes’ on a good-ole transparency sheet. I nestled some blue tissue paper above the transparency sheet for the ‘sky,’ and hot glued the whole thing into place.
What do you think?
I haven’t tallied up how much is pent on the whole dollhouse yet. I’ll do that ‘with you’ in my next post which will feature the last room – Hagrid’s Hut.
I haven’t posted for a few weeks because we’ve been away on a beyond-long-overdue trip to visit family in Scotland. Because of the pandemic it had been nearly three years since we’d seen most of them. It was SO good to all be back together, and to see the kids reunite with their cousins.
The weather was (unusually) warm and sunny and we spent a lot of time outdoors. One thing we often see in the parks we visit in Scotland are fairy trails – whimsical displays of little fairy doors and houses, usually found along woodland paths. Fairies are a big part of Scottish folklore, and while you can find the odd fairy trail here in the US, they are everywhere in Scotland!
Some of the trails are large, professionally built attractions with an entry fee. Others are built and maintained by volunteers in the area for the enjoyment of the public. My favorite trails, though, are the ones that develop more organically on a community level – informal clusters of fairy houses and doors made and left by local fairy-enthusiasts, both old and young.
On this trip we came across a few handmade fairy houses along one of the walking paths that cuts through Barshaw Park in Paisley. They were nestled in and around a few trees at a bend in the path.
I love how varied the little magical homes are, both in their construction and interpretation – each maker’s unique imagination shines through, and there is no right or wrong.
I don’t think a community display like this would survive the public parks here in the city, but who knows? Maybe I’d be pleasantly surprised. If anything, the kids and I can surely dedicate a corner of our garden to fairy life!
I hope to post the next installment of the Hogwarts Castle Dollhouse tour by the end of the week. We’ll see. Jet lag is legit a thing.
I’ll leave you with some totally unrelated pictures of Scotland, just because it’s BEAUTIFUL!!
Both of my kids celebrated their birthdays last month, and they ever-so-cutely decided to gift each other miniatures they made themselves. My daughter made her little brother a Farmer’s Market where he can ‘sell’ the produce and other items from his little farm. I had made the farm-stand and veggies a while back, but she made everything else and put it all together. My favorite part is the little crate of eggs – so cute!
My son, in his usual ‘why-think-small’ mindset, had a long list of things he wanted to make for his big sis. At the top of the list was a car for her dollhouse family. He also made a playground structure, a bunny burrow, and some accessories for the ‘remote school’ room she set up in one of her houses. I did help him quite a bit with constructing the larger pieces, but it was all at his (very specific) direction. My favorite part is the little climbing wall he made for the playground structure!
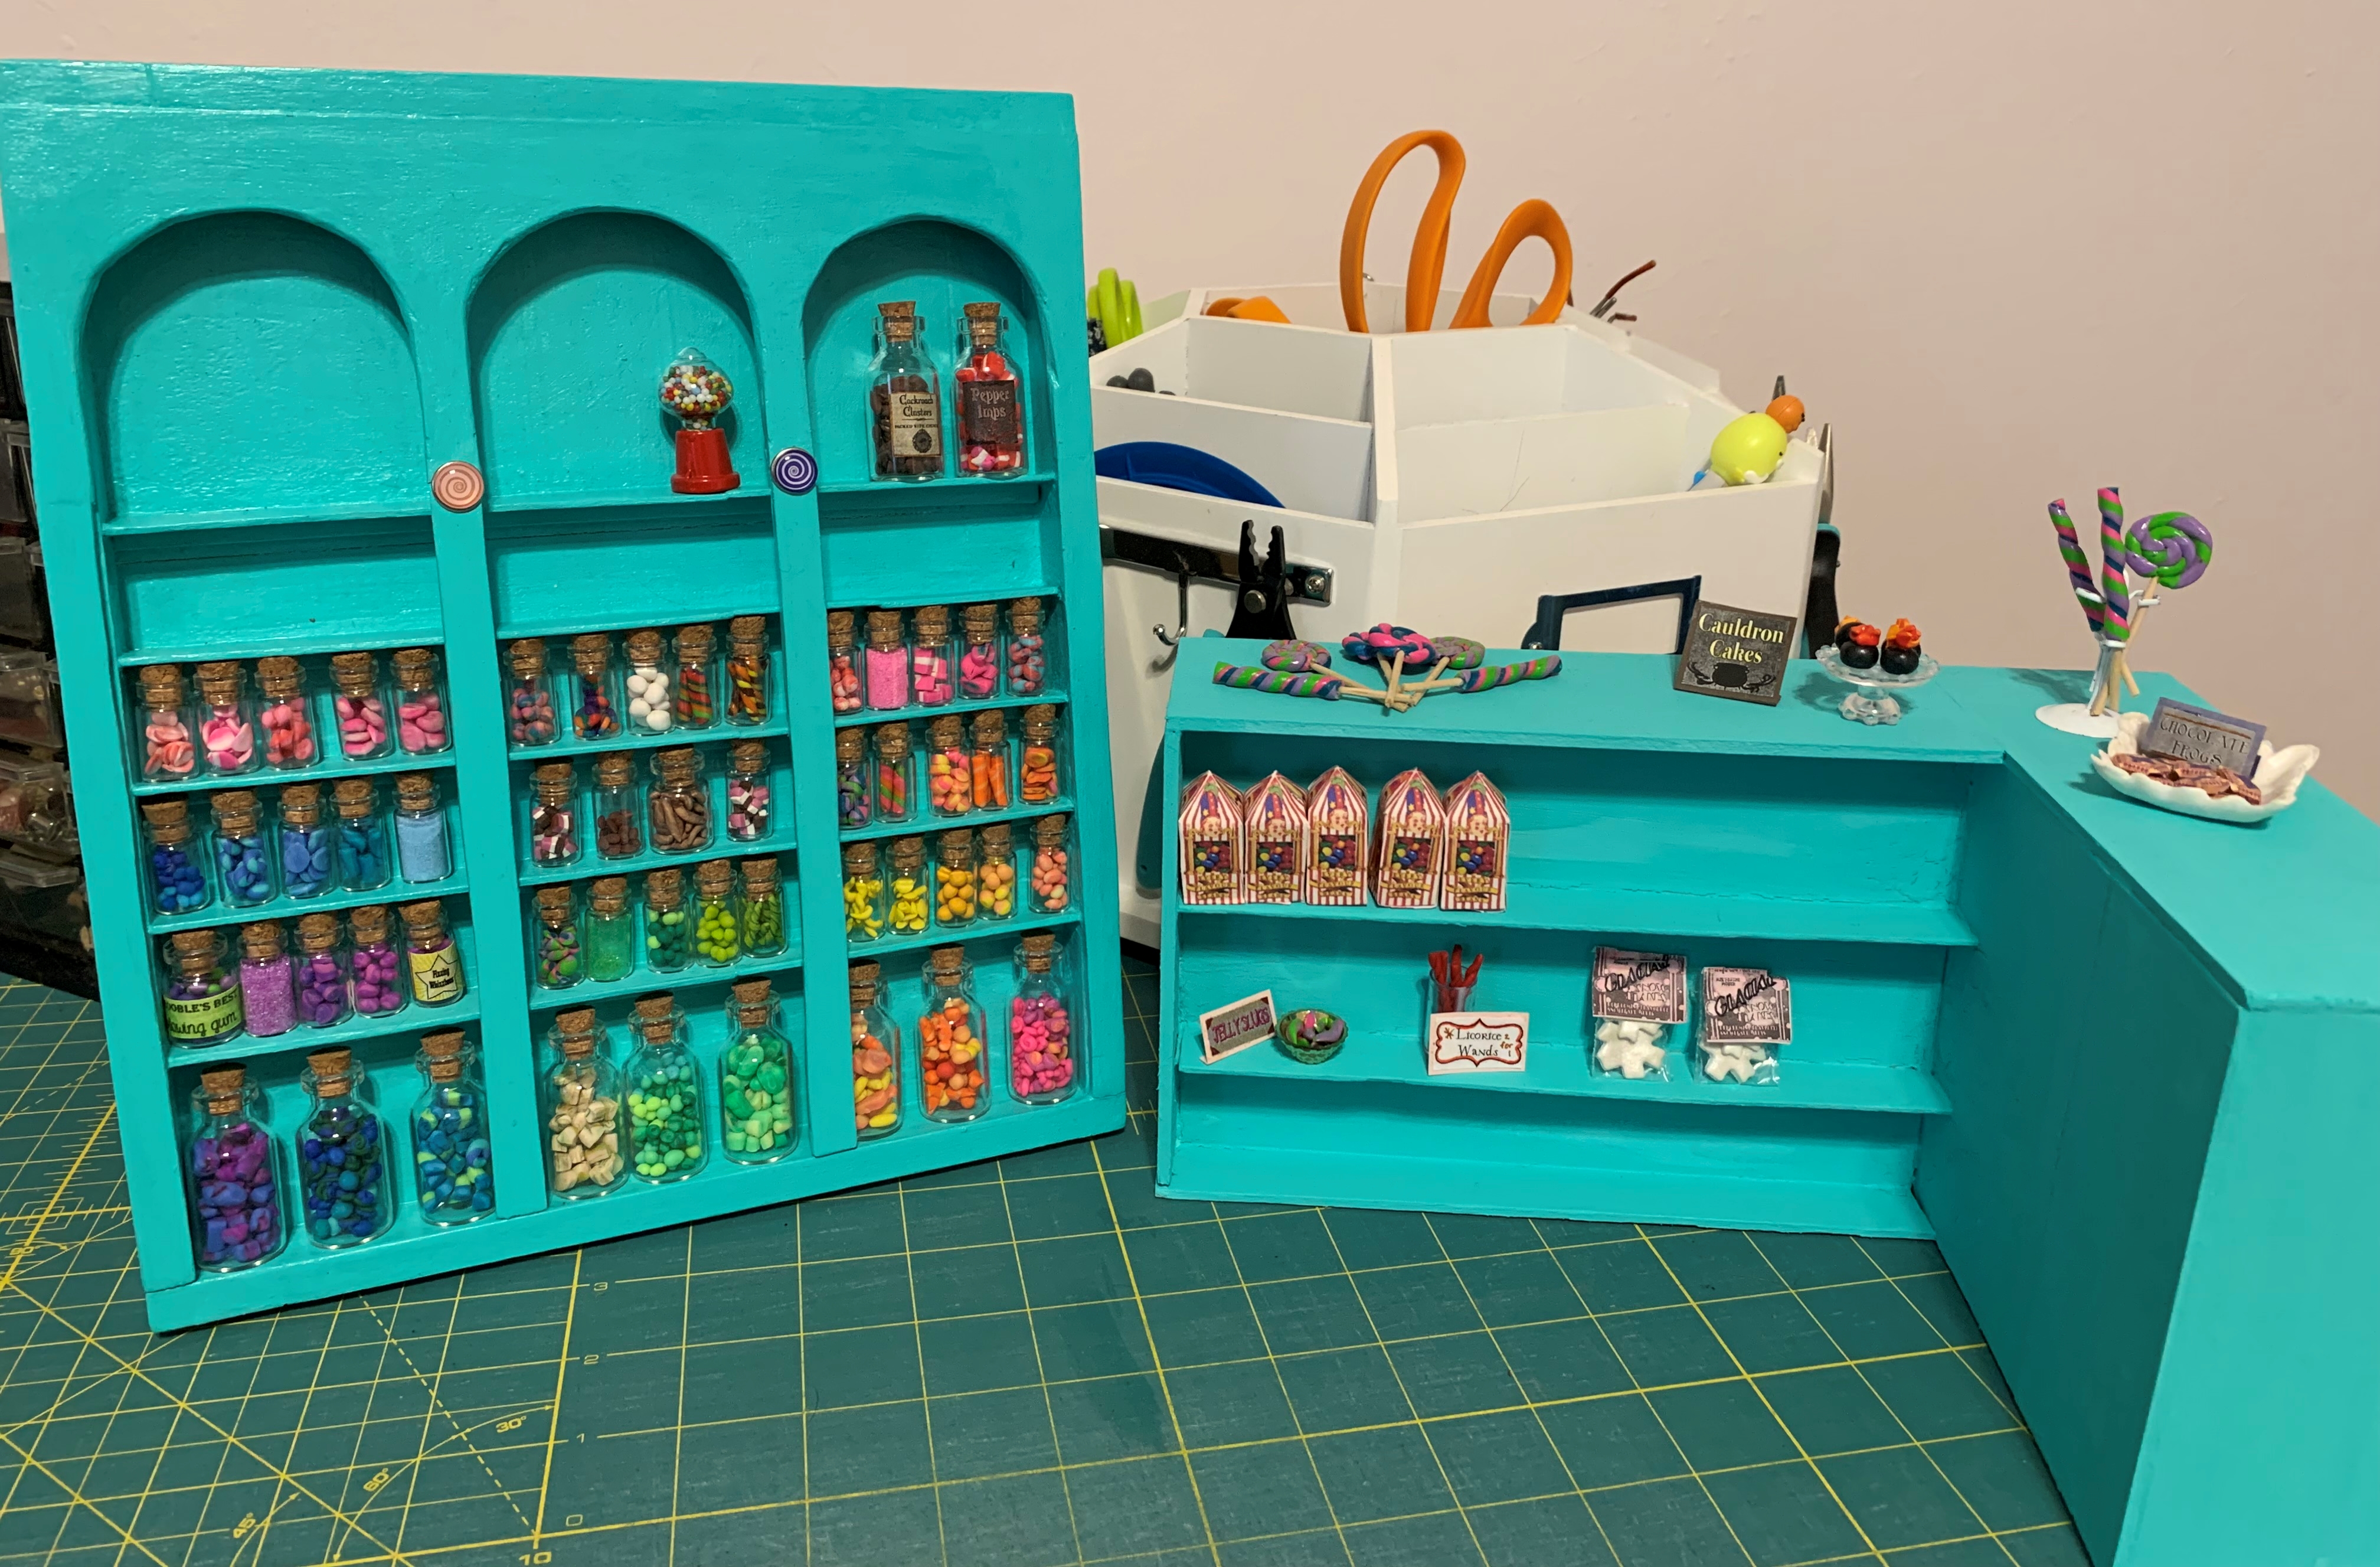
And now, as promised, a sneak peek at something I’ve been working on – pieces for a miniature Honeydukes Sweet Shop! More details to come (and a lot of work to go), but it’s off to a good start and has been a lot of fun to work on.
I painted the stone floor in the classroom (top) a little darker than the one in the Great Hall (below)
This week on our tour of the Hogwarts Castle Dollhouse, I bring you to The Classroom. Note the capital T and capital C. Yes, it is the one and only classroom in the castle. It started out way back as a little collection of items for Potions class, but over time it has morphed into a multi-purpose Hogwarts classroom. (Basically, the bookcase we used to make the dollhouse didn’t have enough real estate available for multiple classrooms).
The Classroom was pretty simple to make. I left the walls gray, and gave it a stone floor using the same technique I used in the Great Hall. For the posters on the walls, I searched through digital copies of vintage books on astrology and mythical creatures to find illustrations that would work. After I printed the pictures and backed them, I glued a thin strip of wood at the top and bottom of each ‘poster’ to give it a more classroom-y look.
Miniature potions galore
The shelf of potions and other items was one of the first things I made for my daughter way back. I made it from one of those little wooden boxes that Melissa and Doug craft sets often come in. I just added the shelves from wood scraps and painted it black. Then I had so much fun filling the shelves! We already had an assortment of miniature jars that fit perfectly. I filled a few with materials I had on hand and glued on little labels. Shreds of an orange craft feather became ‘Feather of Phoenix.’ Loose foliage became ‘Fluxweed.’ Snips of a plastic plant covered with shiny gloss became ‘Gillyweed.’ Green sequins became ‘Mermaid Scales.’ You get the idea.
The other items on the shelf are a total mishmash of things I had or made. I used beads to make little jars, jewelry findings and a marble to make a crystal ball, an earring back and eraser cap to make a goblet, foam and the inner tube of a pen to make a test tube rack, and polymer clay to make a dragon egg and a basilisk fang. The books are made from cardstock, a checkbook cover, and printed images.
The desk is exactly the same as the tables in the Great Hall, only painted black. For the cauldrons – one is the wooden cap from a bottle of Cholula hot sauce, painted black. The other is half of one of those plastic balls that little junky toys come in. (You know, from those toy vending machines at the grocery store that your kids always want quarters for). I much prefer the Cholula cap version and had another one lined up to use, but I failed to let my husband know in time and he threw it out. (He is very efficient). I’ve started on another bottle of hot sauce but it’ll be a while!
The cauldron stands are made from, well, I don’t completely know. The stands themselves are made from chair leg caps propped up by head pins. I have no idea what the ‘burners’ under the stands are – I found them in my grandfather’s workbench and they looked perfect for burners to me.
Malfoy, thrilled as always to be in Potions class
I made the scales on the desk from miniature plastic bowls, the metal loops from a binder clip, a few beads, two headpins, a cotter pin, and a piece of plastic I salvaged from a broken toy. After I glued it all together I slathered it in gold paint.
My purchases for this room: the table against the left wall of the classroom is a Dollar Tree buy (painted dark brown). I bought the mini glass lab flasks for $3.99 and a pack of Tim Holtz Halloween ephemera (I used a few pieces for labels) for $4.99. Total spent: $9.98.
The Classroom is one of the rooms in the dollhouse that my daughter uses the most – what do you think?
Also, I apologize for any email bombardment from post updates this past week. I am learning via my mistakes. But I am learning, so that’s good, right?
I think the Gryffindor Common Room is my favorite space in our DIY Dollhouse. It looks cozy – I’d be pretty happy to curl up in the armchair with a glass of wine and a good book, with the fire going…ahh…
Ok sorry. I thought I was back in Vermont for a second there.
When I think of Gryffindor House I think of red. I covered one wall of the common room with a piece of red scrapbook paper. It has a slight linen texture to it (that’s right, I splurged for a $0.79 sheet instead of the usual $0.49), and between that and the deep red color it gave the room a nice warm feeling.
In that same line of thought, I really wanted to do a wood floor in the common room as it would definitely move the room up a few notches on the warm/cozy scale. Especially compared to, ya know, the cold, castle-y, stone floors everywhere else.
The 874,379,729 (ish) popsicles I trimmed
I had so much fun making the wood floor. I almost gave myself carpal tunnel in the process, but yeah. I cut the curved ends off of approximately 874,379,729 popsicle sticks. Ok, I may be exaggerating a little, but it was a lot. I tried out a few ways of cutting them (wire cutters, craft knives, box cutters..), but in the end a plain old pair of scissors worked the best. My wrist hated me, but it worked.
I decided to make a base or ‘subfloor’ of sorts for two reasons. One – the popsicle sticks are thinner than the wood sheets I used to make the stone floor in the room next door, and I wanted the two floors to be even. And two – I didn’t want to glue the ‘planks’ straight onto the surface of the bookcase. So I pieced some thin sheets of balsa wood together, and glued my little ‘planks’ onto that instead. I off-set the strips a bit from row to row, and cut a few to size here and there.
Piecing together the balsa wood base, and then gluing the wood strips to the base
(This is the point where I discovered that many of the popsicle sticks I cut had been the slightest bit warped. Which meant many of my little ‘planks’ were the slightest bit warped. Which meant they didn’t quite lie flat. Which meant I had to cut the ends off of even more popsicle sticks, until I had enough usable ones. Which meant my wrist went from hating me to really hating me. But I don’t want to talk about that, so I’m not even going to bring it up).
The finished floor. You can see where the wood floor meets the stone floor in the room next door.
Once all the wood pieces were glued down, I sanded my newly pieced floor. And then I sanded it again, and re-sanded it, and gave it one more sand before giving it a final sand. I may have missed one or two sandings in there, but yeah – it was well-sanded. I stained it brown and then applied a darker-brown wash (sanding in between, of course. And after). I gave the floor a coat of semi-gloss varnish, buffed it a bit, and ‘installed’ it on the shelf. I love how it turned out.
With the wall and floor done, I got started on filling up the room. I printed the unicorn tapestry and the rug out on some of the printable fabric sheets I bought for the Great Hall banners. As with the banners, I feel the rug and tapestry could use a bit more ‘body’ but overall I’m pleased. Before purchasing the printable fabric, I had wracked my brain (and google) for AGES trying to come up with a way to make or buy both items. In the end it was quite simple. (And it didn’t involve spending any additional money).
Little touches: The candle on the mantle is made from a bead. The side table is from our stash of dollhouse furniture, and the inkwell/quill set features a real feather.
I did, however, buy a set of two miniature frames for the portraits on the walls. The other frames I either made, cut out of catalogs, or already had. It was fun choosing the ‘people’ to go in the frames. You may recognize some of the faces – many are works of famous artists in mini-sticker-form. (You know those little Dover sticker activity books that keep your kids busy for about 30 seconds while traveling? The ones that come with a few stickers and a little scene to put them on? Well, Dover also makes a series of little books called ‘Dover Fine Arts Stickers’ – and the stickers are the perfect size for dollhouse decor).
I made the armchair and ottoman a year or two back. I used one of those little cardboard boxes that earrings or a necklace come in for the basic frame, padded it out with fiberfill, and then covered it with fabric. I did some minimal sewing for the arms of the chair. They are basically mini bolsters – I stitched along the ends and then pulled on the thread to gather the fabric. Looks cozy!
The extended bed isn’t the prettiest, but when it’s all made up, who would know?
I received the fireplace and Harry’s bed from a very generous Craigslist-er who passed on a ‘free to a good home’ vintage dollhouse to us, along with a box of furniture and accessories. The bed was a bit short for the Harry Potter dolls, so I extended it with some wood scraps. The piece that attaches the posts at the foot of the bed was already loose/off when I got it, so it was easy to add some length there. All of the bed linens and pillows are from scraps of fabric in my stash.
Harry’s bed and belongings. See the Monster Book of Monsters peeking out from under the bed?
I think that’s pretty much it! The little posters and newspapers are from a Harry Potter sticker book – I just backed them with cardstock. As I mentioned in one of my other posts, Harry’s trunk was one of the first pieces I made for my daughter – it’s repurposed from a little wooden chest she used with her dolls during her pioneer girl phase. Oh, and I can’t forget Hedwig. I already had the birdcage, and for Hedwig himself I painted a little wooden peg I had left over from another project.
Since I had already purchased the printable fabric sheets for the Great Hall room, all I spent on the Common Room was $3.78 for the frames and scrapbook paper. Woohoo!
I’ll end with Hermione and Harry chilling out in their new space.